
Lesson guide
Learning objectives
- Explain the main purpose of From the orbital height in JavaScript.
- Identify the syntax, APIs, or concepts introduced in this lesson.
- Use the examples to predict how JavaScript will behave before you run similar code.
- Connect this topic to nearby lessons in Web components.
Real-world context
This lesson matters when you need to recognize where From the orbital height fits into real JavaScript programs. This section describes a set of modern standards for “web components”.
Key ideas
- From the orbital height is part of the Web components chapter, so it builds on the surrounding concepts rather than standing alone.
- Read each code example in two passes: first for the result, then for the rule that explains the result.
- When a section compares similar features, focus on the condition that makes you choose one feature over another.
Key terms
- From the orbital height
- orbital
- height
- Web components
- JavaScript
This section describes a set of modern standards for “web components”.
As of now, these standards are under development. Some features are well-supported and integrated into the modern HTML/DOM standard, while others are yet in draft stage. You can try examples in any browser, Google Chrome is probably the most up to date with these features. Guess, that’s because Google fellows are behind many of the related specifications.
What’s common between…
The whole component idea is nothing new. It’s used in many frameworks and elsewhere.
Before we move to implementation details, take a look at this great achievement of humanity:
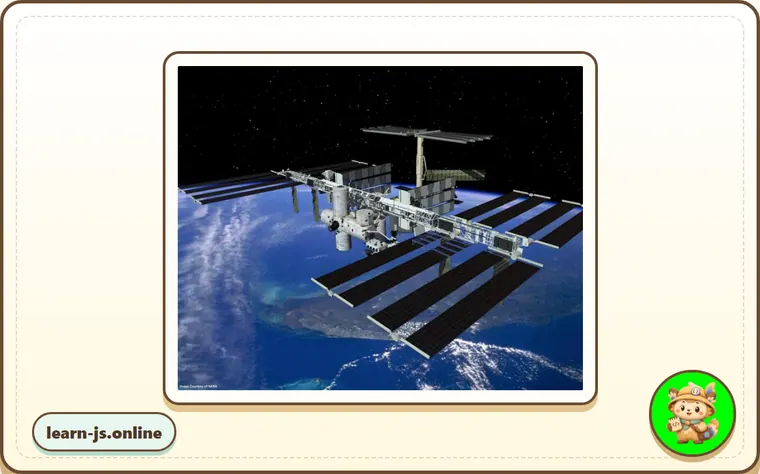
That’s the International Space Station (ISS).
And this is how it’s made inside (approximately):
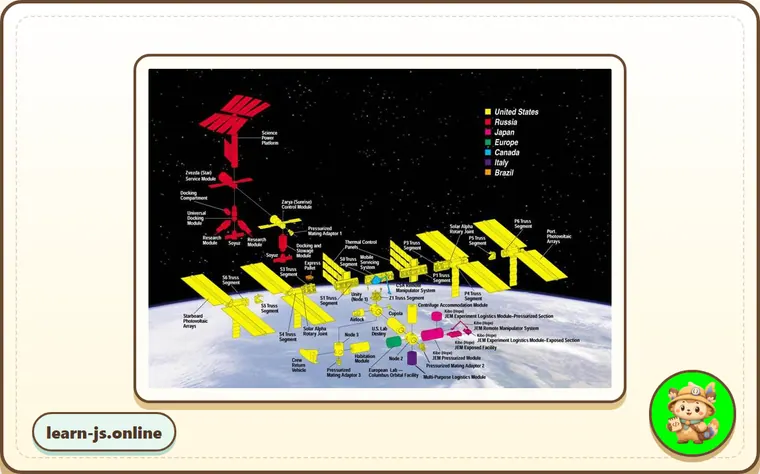
The International Space Station:
- Consists of many components.
- Each component, in its turn, has many smaller details inside.
- The components are very complex, much more complicated than most websites.
- Components are developed internationally, by teams from different countries, speaking different languages.
…And this thing flies, keeps humans alive in space!
How are such complex devices created?
Which principles could we borrow to make our development same-level reliable and scalable? Or, at least, close to it?
Component architecture
The well known rule for developing complex software is: don’t make complex software.
If something becomes complex – split it into simpler parts and connect in the most obvious way.
A good architect is the one who can make the complex simple.
We can split user interface into visual components: each of them has own place on the page, can “do” a well-described task, and is separate from the others.
Let’s take a look at a website, for example Twitter.
It naturally splits into components:
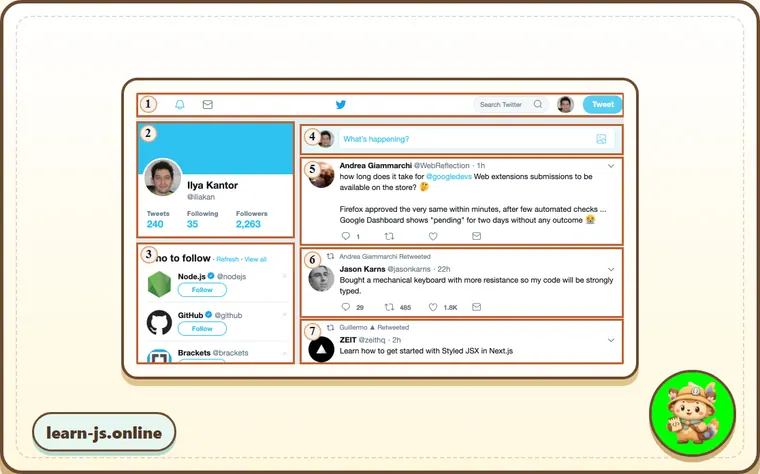
- Top navigation.
- User info.
- Follow suggestions.
- Submit form.
- (and also 6, 7) – messages.
Components may have subcomponents, e.g. messages may be parts of a higher-level “message list” component. A clickable user picture itself may be a component, and so on.
How do we decide, what is a component? That comes from intuition, experience and common sense. Usually it’s a separate visual entity that we can describe in terms of what it does and how it interacts with the page. In the case above, the page has blocks, each of them plays its own role, it’s logical to make these components.
A component has:
- Its own JavaScript class.
- DOM structure, managed solely by its class, outside code doesn’t access it (“encapsulation” principle).
- CSS styles, applied to the component.
- API: events, class methods etc, to interact with other components.
Once again, the whole “component” thing is nothing special.
There exist many frameworks and development methodologies to build them, each with its own bells and whistles. Usually, special CSS classes and conventions are used to provide “component feel” – CSS scoping and DOM encapsulation.
“Web components” provide built-in browser capabilities for that, so we don’t have to emulate them any more.
- Custom elements – to define custom HTML elements.
- Shadow DOM – to create an internal DOM for the component, hidden from the others.
- CSS Scoping – to declare styles that only apply inside the Shadow DOM of the component.
- Event retargeting and other minor stuff to make custom components better fit the development.
In the next chapter we’ll go into details of “Custom Elements” – the fundamental and well-supported feature of web components, good on its own.
Common mistakes
- Skipping the small examples and then missing the exact rule that From the orbital height depends on.
- Copying code without changing one value at a time to see which part controls the result.
- Treating similar-looking syntax or APIs as interchangeable before checking their edge cases.
Summary
- From the orbital height gives you one more piece of the JavaScript mental model.
- The examples in this lesson are the quickest way to check whether the rule is clear.
- Revisit the key terms when you meet the same idea in later chapters.
Predict
Before running this Web Components overview model, predict the five output lines. It maps the four standards in the lesson to the component responsibilities they solve: custom tags, private DOM, scoped styles, and event behavior across the boundary.
Reveal explanation
The model treats a component as a visual unit with its own class, DOM, styles, and public API. The tag contains a hyphen, matching the custom-element naming rule introduced next. Custom elements connect a tag to a class, Shadow DOM hides internal markup, CSS scoping keeps styles local, and event retargeting lets outside code handle the component through its host.
Try it
Remove shadowDOM from userCard.uses, then predict which responsibility disappears from the output and what kind of encapsulation the component would lose.
Practice
- Rewrite one example from this lesson without looking at the original, then run it and compare the result.
- Change one input, operator, method call, or option in a code sample and predict what will happen before running it.
- Explain From the orbital height in your own words as if you were reviewing it with another learner.
Keep learning
Continue with Custom elements when you are ready for the next lesson.